Replacing a garbage disposal is often simpler than installing one for the first time. A replacement can reuse existing plumbing and electrical connections when they are in good shape. A first-time installation may need new drain fittings, a switch, an approved receptacle, or other electrical work.
Every disposal must match the sink opening, the drain layout, and the space under the cabinet. Models vary in size, mounting design, and power connection. The manufacturer manual is the final word on model-specific steps, so keep it close during the job.
This guide covers both situations. It walks through tools, sink and drain compatibility, mounting, dishwasher connections, drain alignment, electrical options, leak testing, and troubleshooting, along with when to call a licensed plumber or electrician instead of doing the work yourself.
Can You Install a Garbage Disposal Yourself?
Replacing an existing disposal may suit a homeowner with basic tools and some patience. This works best when a compatible mounting system is already in place, the drain connections line up, and a proper switched outlet or approved cord connection already exists.
It also helps if the plumbing shows no damage, you’re comfortable with basic tools, and the new model’s instructions are clear.
Professional help matters more in other cases. These include a kitchen with no disposal currently installed, no suitable electrical supply, or a model that needs hardwiring. Some local rules require a licensed electrician for wiring work regardless of your comfort level.
A few plumbing conditions also call for a plumber. These include a sink or drain that needs modification, a badly corroded drain, or a cabinet floor with water damage. If the new unit doesn’t align with the existing trap, or the sink can’t safely support the added weight, get a professional opinion first. If working under the sink makes you uneasy, that’s a reasonable signal to call for help.
Before You Buy a Garbage Disposal
Check the Sink Opening
Many residential disposals fit a standard sink drain opening, but confirm the specific model works with your specific sink. Stainless steel, composite, cast iron, and fireclay sinks can all differ slightly in opening design and thickness.
Deep sinks and farmhouse sinks sometimes need extra clearance. Double bowl sinks add planning, since usually only one bowl holds the disposal. There’s no single thickness limit that applies everywhere, so check the existing flange for cracks or wear before deciding whether to reuse it.
Measure the Space Under the Sink
Measure the cabinet before buying. Consider the disposal’s height and width, the cabinet floor, the drain outlet height, and the P-trap position, which is the curved pipe that holds water to block sewer odors.
Note where the dishwasher hose runs, along with any water supply valves, filter systems, or pull-out trash containers nearby. Cabinet doors and drawers need room to close once the disposal is in. A more powerful disposal often has a larger body, but that doesn’t mean a bigger household automatically needs a bigger unit.
Check the Mounting System
Mounting systems vary by manufacturer, and sometimes by model line within the same brand. Common designs include a three-bolt mount and a twist-lock or quick-mount style.
Compare your existing hardware to the new model’s requirements rather than assuming a match. Reusing an old mount only makes sense when the new disposal is compatible with it and the parts are still sound.
Check the Drain Layout
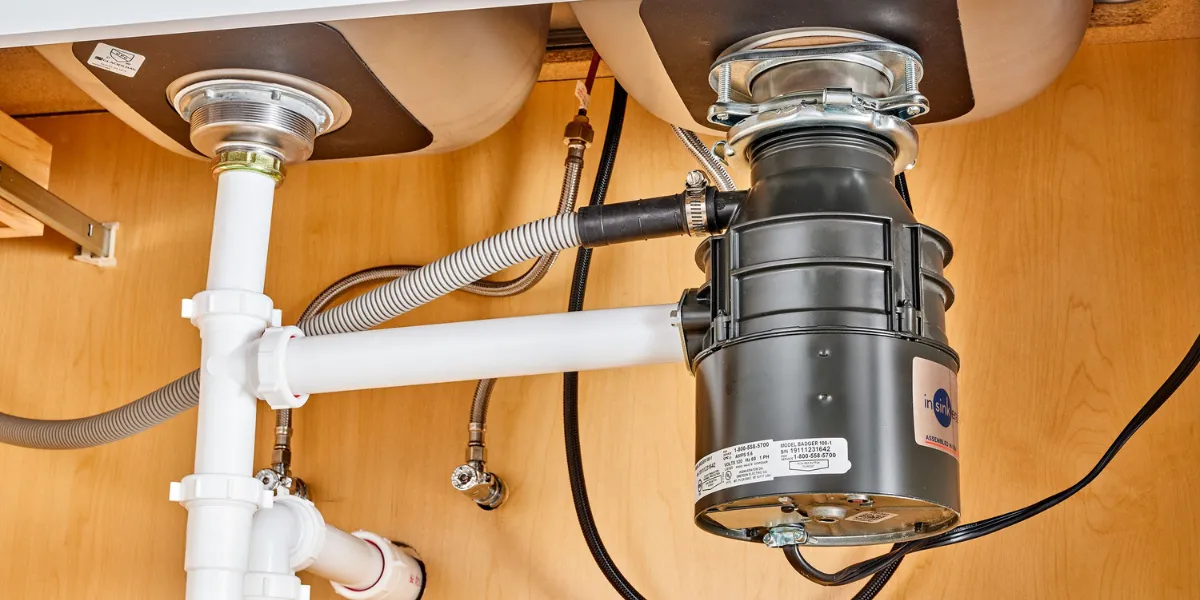
The drain layout affects how smoothly the new disposal connects. Relevant parts include the discharge outlet, the waste arm, the P-trap, and the wall drain the system ties into.
Double sinks often use a continuous waste tee to combine drainage from both bowls. Drain slope and any existing extension tubes matter too, since misaligned connections are one of the most common sources of frustration. The discharge outlet needs to sit high enough to drain properly into the trap. Flexible accordion drain pipe might look like an easy fix for misalignment, but it isn’t the preferred solution and can create its own drainage problems.
Check the Electrical Supply
Garbage disposals use one of several power arrangements: a factory-installed cord, a separate approved cord kit, a switched receptacle, a hardwired connection, a wall switch, or an air switch, which is a countertop button that activates the disposal through an air-pressure signal.
Electrical requirements vary by model and by local code. Confirm specific details against the manufacturer’s instructions and current official code guidance for your area.
Tools and Materials Needed
The exact list depends on the disposal, the sink, the plumbing layout, and the power connection you use.
| Item | Purpose | When It May Be Needed |
|---|---|---|
| Adjustable pliers | Grips nuts and fittings | Most installations |
| Channel lock pliers | Extra grip on stubborn slip nuts | Most installations |
| Screwdrivers | Removes cover plates and screws | Most installations |
| Putty knife | Scrapes old putty from the sink | Replacement jobs |
| Bucket | Catches residual water | All installations |
| Towels | Protects the cabinet floor | All installations |
| Flashlight | Improves visibility under the sink | All installations |
| Tape measure | Confirms clearance and drain height | Before buying and during install |
| Hacksaw or pipe cutter | Trims drain pipe to length | When alignment needs adjusting |
| Non-contact voltage tester | Confirms power is off | All electrical work |
| Manufacturer disposal wrench | Frees a jam or aids mounting | Model dependent |
| Plumber’s putty | Seals the sink flange when approved | Most sink types |
| Silicone sealant | Seals the flange when required | Some sink materials |
| Replacement drain fittings | Connects the outlet to the drain | When old fittings don’t match |
| Approved power cord kit | Adds a plug connection | Cord-connected models |
| Strain relief connector | Protects the cord where it enters the unit | Cord kit and hardwired installs |
| Wire connectors | Joins electrical conductors | Cord kit and hardwired installs |
| Dishwasher hose clamp | Secures the hose to the inlet | When a dishwasher connects |
| Disposal discharge tube | Carries wastewater to the trap | Most installations |
| Manufacturer mounting parts | Secures the disposal to the flange | All installations |
Parts of a Garbage Disposal Installation
Sink Flange
The flange sits inside the sink’s drain opening and forms the upper seal.
Plumber’s Putty or Approved Sealant
The right sealing material depends on your sink material and the manufacturer’s instructions. Putty may not suit some stone, composite, or porous surfaces, since it can stain or fail to bond.
Rubber and Fiber Gaskets
Gaskets seal mounting parts together. Their order varies by manufacturer, so follow the manual.
Backup Flange
Supports the mounting parts from underneath the sink.
Mounting Ring
Secures the disposal body to the flange assembly.
Snap Ring
Holds parts of some mounting assemblies together.
Disposal Body
Contains the motor and grinding chamber, the main working part of the unit.
Discharge Outlet
Where wastewater leaves the disposal before entering the drain system.
Dishwasher Inlet
Some models include this port for a dishwasher’s drain hose to connect directly.
Knockout Plug
Blocks the dishwasher inlet from the factory. Remove it only when a dishwasher will actually drain through the disposal, and take the loose plug out of the chamber once it’s free.
P-Trap
Holds water to block sewer gas, and fits into the drain line after the disposal’s outlet.
Power Cord or Hardwired Connection
Some models use an approved plug, others connect directly to household wiring. The correct steps depend entirely on the model, so follow its manual.
Safety Precautions Before Installation
Turn off the circuit at the breaker before starting. Verify the power is off with a non-contact voltage tester, and never rely only on the wall switch.
Keep the work area dry. Remove stored items from below the sink, place a bucket under the drain connections, and support the old disposal before releasing it, since these units can be heavy.
Wear eye protection, and use gloves when handling old drain parts. Avoid reaching inside the disposal at any point, and keep children and pets away from the work area.
Follow the product manual for model-specific safety notes. Watch for electrical shock risk, water near electrical parts, a falling disposal, sharp metal edges, sewage or food residue, damaged wiring, leaking valves, and weak sink material.
Stop the project if you find unsafe wiring, burned insulation, standing water near electrical parts, or plumbing damage beyond what you expected. These call for professional review.
How to Remove an Existing Garbage Disposal
Step 1. Turn off and verify the power. Shut off the correct breaker and confirm no power reaches the unit before touching any wiring.
Step 2. Clear and protect the cabinet. Remove stored items, add a work light if needed, lay down towels, and position a bucket under the drain area.
Step 3. Disconnect the dishwasher hose. If connected, loosen the clamp and disconnect it. Some residual water may drain out. Not every disposal connects to a dishwasher, so this may not apply.
Step 4. Disconnect the drain pipe. Loosen the discharge tube or trap connection. Avoid forcing corroded fittings, since excess force can crack old pipe.
Step 5. Disconnect the power. A corded unit can be unplugged once the circuit is confirmed off. A hardwired connection should only be handled by someone qualified to do that work.
Step 6. Support and release the disposal. Support the unit’s weight, then release it from the mounting ring following the manufacturer’s design.
Step 7. Remove or inspect the existing mount. Decide whether to replace or reuse the hardware based on rust, cracks, loose parts, failed putty, past leaks, or incompatibility with the new model.
How to Install the Sink Flange and Mounting Assembly
Step 1. Clean the sink opening. Remove old putty and residue without scratching the sink surface.
Step 2. Apply the approved seal. Use plumber’s putty or another approved sealant based on your sink material and the disposal’s instructions.
Step 3. Insert the sink flange. Place it evenly into the opening from above so it sits level.
Step 4. Assemble the parts below the sink. Working from underneath, assemble the gasket, backup flange, mounting ring, and snap ring in the order the manual specifies, since this order varies by manufacturer.
Step 5. Tighten the mount evenly. Tighten the screws a little at a time, moving between them rather than fully tightening one first. Uneven tightening can tilt the flange or break the seal. There’s no single torque value for every model, so follow the manual.
Step 6. Remove excess sealant. Clean away any putty or sealant that squeezed out around the edges.
How to Prepare the Garbage Disposal
Install the Power Cord When Required
If a cord kit is needed, the wiring connection must follow the manufacturer’s cord kit instructions and applicable electrical rules. General parts often include an electrical cover plate, a black or line conductor, a white or neutral conductor, a green or bare ground conductor, wire connectors, and a strain relief fitting.
This guide doesn’t provide step-by-step hardwiring instructions, since details differ by model. Don’t alter household wiring unless you’re qualified. A licensed electrician should handle this when you’re unsure.
Remove the Dishwasher Knockout Plug
This applies only when a dishwasher will drain through the disposal. Skipping this step blocks the dishwasher from draining. Removing the plug with no dishwasher connected can create a leak point unless properly capped per the product instructions.
Attach the Discharge Tube When Required
Some models need the discharge elbow or tube attached before mounting, involving a gasket, a flange, and screws in a model-specific orientation. Follow the manual rather than guessing at the order.
How to Mount the Garbage Disposal
Step 1. Position the disposal under the sink, supporting it with both hands or safe temporary support.
Step 2. Align the mounting tabs with the mounting assembly’s ramps or slots.
Step 3. Rotate and lock the unit. The locking motion varies by brand. Use the supplied wrench if the manual calls for one.
Step 4. Orient the discharge outlet by rotating the disposal so it lines up with the existing drain pipe.
Step 5. Confirm the unit is secure. The mount should be fully engaged and the disposal should hang level. Don’t overtighten or strike the unit to force it into place.
How to Connect the Dishwasher to the Disposal
This section applies only when a dishwasher drains through the disposal.
- Confirm the knockout plug was removed.
- Remove the loose plug piece from inside the chamber.
- Inspect the dishwasher hose for cracks or wear.
- Route the hose so it reaches the inlet without unnecessary bends.
- Create a high loop, or use an approved air gap, if your local rules require one.
- Slide the hose over the dishwasher inlet.
- Secure it with the correct clamp.
- Check the hose for kinks.
- Confirm it doesn’t rest against sharp edges.
Local rules may require an air gap fitting at the sink or countertop. A high loop isn’t automatically an acceptable substitute everywhere, so check your local requirements.
How to Connect the Disposal Drain Pipe
Relevant parts include the discharge elbow, a discharge tube, slip joint washers, slip nuts, a waste tee, the P-trap, the trap arm, and the wall drain.
- Compare the disposal’s outlet position with the existing drain layout.
- Rotate the disposal if needed for better alignment.
- Measure whether any pipe sections need shortening or replacing.
- Cut approved drain pipe squarely if a length change is needed.
- Remove burrs from any freshly cut edges.
- Install washers facing the correct direction.
- Hand tighten slip joint connections first.
- Align the P-trap so it sits without strain on either end.
- Tighten connections carefully.
- Avoid putting stress on the disposal’s outlet while tightening.
Never force drain pipes into alignment. Poor alignment can cause leaks, trapped waste, or ongoing strain on the fittings. Avoid excessive sealant on slip joint connections, since these rely on the washer for a proper seal, and never use chemical drain cleaner during installation.
How to Connect the Electrical Supply
Plug-In Disposal
Some disposals use an approved power cord connected to a switched receptacle under the sink. The receptacle must be suitable for that location, and the switch must control the correct receptacle. Keep the cord free of pinching, leaks, and sharp edges, and connect the unit according to its grounding instructions.
Hardwired Disposal
Some units connect directly to household wiring. Electrical rules vary by location and circuit.
Call a licensed electrician when a new circuit or switch is needed, there’s no approved junction point, existing wiring looks damaged, you can’t identify the conductors safely, or local rules require licensed work. This guide doesn’t provide full wiring directions or universal circuit ratings, since these depend on your home and local code.
How to Test a New Garbage Disposal
Step 1. Check the cabinet for tools, loose hardware, the knockout plug piece, and debris.
Step 2. Check the mounting assembly to confirm the disposal is fully locked in and doesn’t shift.
Step 3. Check every plumbing connection, including the flange, mounting assembly, discharge tube, P-trap, waste tee, and dishwasher hose.
Step 4. Restore water by filling the sink partly. Don’t start the disposal yet.
Step 5. Test for static leaks by releasing the sink water and watching every joint closely. A dry paper towel pressed against a joint can reveal a small drip.
Step 6. Restore electrical power only once the plumbing has stayed dry.
Step 7. Run cold water, following the manufacturer’s recommended testing sequence.
Step 8. Start the disposal briefly, listening for smooth operation, grinding, vibration, rattling, humming without turning, or movement at the mount.
Step 9. Test the dishwasher connection by running a drain cycle and checking the hose and inlet for leaks.
Step 10. Recheck after use, since some slow leaks only appear after a short delay.
Garbage Disposal Installation Troubleshooting
Shut off power before touching the unit whenever troubleshooting.
| Problem | Possible Cause | Safe Next Step |
|---|---|---|
| Leak at the sink flange | Worn sealant, uneven tightening | Recheck the seal and tightening, reseal if needed |
| Leak at the mounting assembly | Loose screws, damaged gasket | Tighten evenly, inspect the gasket |
| Leak at the discharge tube | Loose clamp, worn gasket, misalignment | Recheck the clamp and alignment |
| Leak at the P-trap | Loose slip nut, cracked pipe | Retighten by hand first, check for cracks |
| Leak at the dishwasher inlet | Loose clamp, missing knockout removal | Check the clamp and knockout plug |
| Disposal hums but doesn’t turn | Jam in the chamber | Shut off power, use the manual’s wrench guidance |
| Disposal doesn’t start | No power, tripped breaker | Check the breaker, call an electrician if needed |
| Disposal vibrates | Loose mount, object inside | Shut off power, check mounting and chamber |
| Disposal hangs unevenly | Tabs not fully engaged | Shut off power, recheck the mounting steps |
| Drain pipe doesn’t line up | Incorrect rotation, mismatched fittings | Rotate the disposal, confirm fittings match |
| Dishwasher doesn’t drain | Knockout plug not removed | Shut off power, confirm the plug was cleared |
| Water backs into the other bowl | Improper double sink layout | Have a plumber review the tee and trap |
| Disposal trips the breaker | Electrical fault or overload | Shut off power, call an electrician |
| Unusual electrical smell | Wiring problem, overheating | Shut off power immediately, call an electrician |
| Water appears near wiring | Leak reaching an electrical area | Shut off power immediately, call a professional |
Do not continue operating the disposal with an electrical smell, a tripping breaker, water near wiring, severe vibration, a cracked housing, a leaking flange, or damaged wiring.
Common Garbage Disposal Installation Mistakes
Forgetting to shut off the breaker, or relying only on the wall switch, tops the list of serious mistakes. Choosing a disposal that doesn’t fit the sink or cabinet space causes problems from the start.
Reusing damaged mounting parts, using the wrong sealant, or installing gaskets in the wrong order can all lead to leaks. Forgetting the dishwasher knockout plug, or leaving the loose plug piece inside the unit, are easy steps to miss. Skipping a required high loop or air gap is a related oversight.
Forcing drain pipes into alignment, installing the trap incorrectly, or using flexible accordion pipe as a shortcut often causes trouble later. Overtightening plastic fittings can crack them, and failing to support the disposal during removal risks dropping a heavy unit.
Pinching the power cord, ignoring local electrical rules, restoring power before checking for leaks, and testing without running water are all worth slowing down for. Leaving tools inside the grinding chamber, and failing to follow the model’s manual, round out the list.
Installing a Disposal in a Double Sink
Double bowl sinks usually hold the disposal under one bowl only. The system typically uses a waste tee or baffle tee to combine drainage from both bowls into a shared line.
The dishwasher connection, if present, still runs into the disposal side. The P-trap position and drain outlet height both need to work with this combined layout. Poor alignment between the two bowls can let water back up into the bowl without a disposal. A single trap is commonly used for the connected system, but the exact layout must follow your local plumbing requirements.
Replacing a Disposal With the Same Brand
Staying with the same brand can simplify things, but it doesn’t guarantee a perfect match. Check the mount design, the disposal’s size, and the drain outlet location.
Compare the power cord type, the dishwasher inlet position, and the model’s instructions. Look at the condition of the old flange and mounting hardware before reusing them, since not every model from the same brand uses an identical mount.
Replacing a Disposal With a Different Brand
Switching brands often means replacing more parts: a new sink flange, new mounting hardware, drain pipe changes, a different discharge tube, a new cord kit, more cabinet clearance, or an adjusted dishwasher hose. Never force incompatible parts together to save a step, since mismatched parts rarely seal properly.
When a Garbage Disposal Should Not Be Installed
Some local wastewater rules limit or prohibit garbage disposals. Not every septic system is suitable for one, though this doesn’t apply everywhere.
A damaged sink, a rotted cabinet floor, or a drain outlet positioned too high all complicate installation. Badly corroded plumbing, no safe electrical supply, or a sink that can’t support the weight are reasons to pause. A drain that repeatedly backs up points to an existing problem installation alone won’t fix. If the building owner doesn’t allow it, or a permit is required, address that first. Any installation that conflicts with the manufacturer’s instructions shouldn’t proceed as planned.
When to Hire a Plumber
Call a licensed plumber for a first-time installation, major drain pipe changes, a badly corroded P-trap or wall drain, or a disposal outlet that won’t align. A sink flange that keeps leaking, a cracked or unusually thick sink, or a confusing double sink layout also call for help.
If water backs up after your own attempt, if a permit or inspection is required, if you can’t safely support the unit, if the existing plumbing is damaged, or if the job goes beyond the product manual, bring in a professional.
When to Hire an Electrician
Call a qualified electrician when there’s no switched receptacle available, a new circuit is needed, or hardwiring is required and you’re not qualified to do it. Damaged wiring, a breaker that keeps tripping, or a switch that doesn’t control the unit correctly also need an electrician.
Uncertainty about grounding, water that has contacted electrical parts, local rules requiring licensed work, and an air switch that needs a new electrical setup round out the list.
Frequently Asked Questions
How long does it take to install a garbage disposal?
The time needed depends on compatibility, access under the sink, drain alignment, and the electrical setup. A straightforward replacement usually moves faster than a first-time installation with new wiring or plumbing.
Can I install a garbage disposal in any sink?
Not automatically. The sink opening, its strength, cabinet space, drain position, and the manufacturer’s requirements all need to line up before a given model will work.
Do I need plumber’s putty?
It depends on the disposal’s instructions and your sink material. Some surfaces call for plumber’s putty, while others need a different approved sealant.
Does a garbage disposal need its own P-trap?
The P-trap blocks sewer gas and sits in the drain line after the disposal’s outlet. The exact layout depends on your specific sink and drain configuration.
Can I reuse the old mounting ring?
Sometimes, depending on whether the new disposal is compatible with that system and whether the old parts are still in sound condition.
Do I need to remove the dishwasher knockout plug?
Only if a dishwasher will drain through the disposal. Without that connection, the plug should normally stay in place.
Why is my new garbage disposal leaking?
Leaks commonly show up at the sink flange, a gasket, the discharge tube, the trap, or the dishwasher hose connection. Checking each point helps narrow down the source.
Can I plug a garbage disposal into a regular outlet?
This depends on the receptacle type, the switching setup, grounding, the model’s instructions, and local electrical rules. There’s no single answer that fits every home.
Does a garbage disposal need an air switch?
Not necessarily. A standard wall switch or an approved air switch can both control a disposal, depending on your kitchen’s setup.
Can I install a disposal without a dishwasher?
Yes. The dishwasher inlet stays unused, and the knockout plug should normally remain in place to prevent a leak point.
Why does the disposal hum after installation?
A humming sound with no turning usually points to a jam, an incorrect wiring connection, or an object stuck inside. Cut the power before inspecting the chamber.
Should I test the disposal before checking for leaks?
No. Plumbing connections should be tested with water first, before the disposal runs electrically, to confirm they stay dry before adding motion and vibration.
Conclusion
A successful installation starts with confirming compatibility between the disposal, the sink, and the drain layout. From there, following the model’s manual matters more than general instructions. Shutting off and verifying power, installing the flange and mount correctly, and connecting the dishwasher only when needed all support a clean result.
Aligning the drain without forcing it, testing the plumbing before restoring power, and knowing when to bring in licensed help protect both the installation and your home.